Why u no zoom?
I recently developed a couple of graph-based editors for the excellent Unity3D engine. While doing so I ran into a problem that I've noticed other similar editors available on the Unity Asset Store have run into as well. None of the ones I could find have solved this problem satisfactorily. The thing I'm talking about is zooming the contents of an editor window or part of an editor window in and out. In this post I'll describe a technique to achieve this somewhat nicely and without too much effort. My solution can easily be integrated into an existing editor window class that needs to zoom certain parts of its contents in and out.
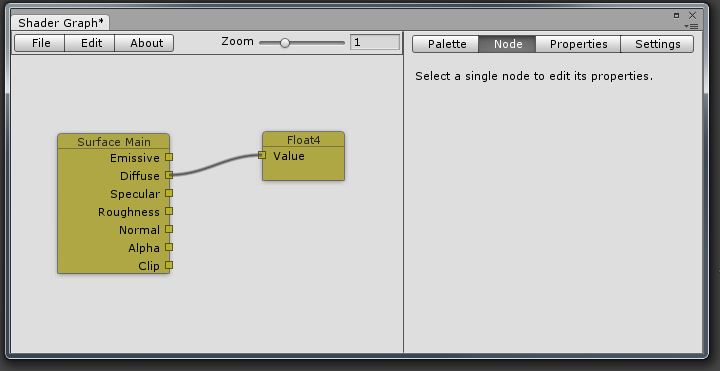
An example of one of my zoomable graph editors.
My graph editors have a main area where the graph is displayed in the form of a bunch of boxes connected by Bezier splines (see above image). Typically on the top there is a menu bar and on the right is a panel that displays various properties of the currently selected graph node. Like any other custom editor window my graph editors inherit from the EditorWindow class. The goal now is to be able to scale the graph area of the window. I wanted to be able to do this both via a slider, where the scaling occurs centered around the top-left corner of the graph area, and with the mouse wheel, where the scaling occurs centered around the current mouse position.
How to do it easily?
There are two key insights I want to present to implement easy zooming in the Unity editor:
- Arbitrary contents rendered to an editor window can be scaled by modifying the scale of GUI.matrix.
- An EditorWindow's OnGUI function is always called inside an implicit GUI.BeginGroup call where the draw area is offset vertically by 21 pixels and is clipped to the screen extents of the window.
So to correctly zoom any rectangle inside of an EditorWindow without changing any of our existing draw code we need to end the implicit group that Unity begins itself before calling our OnGUI, and we need to change GUI.matrix while we draw the part of the window that we want to zoom.
The reason we need to end the group is because we need to effectively turn off clipping against the editor window extents and change it to clip against the size of our zoomed area. This is important for when the content is zoomed out really far and our drawing code, which still assumes a 1:1 correspondence between logical coordinates and editor window pixels, needs to render beyond the borders of the window itself because of the high zoom. The scale set in GUI.matrix will then scale this new clip area to the correct size.
Here are some screenshots from the example code you can find at the end of this post.
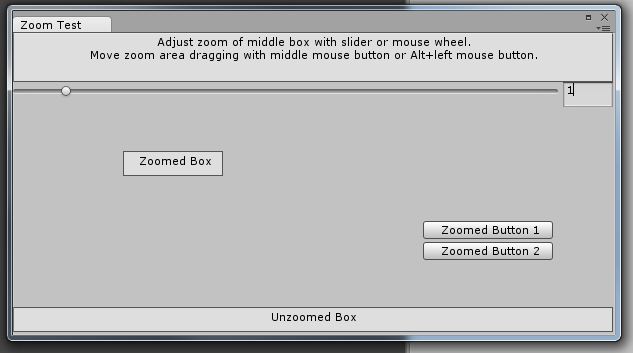
The ZoomTest editor window with a zoom scale of 1.0, i.e. no zooming.
This is what you see when you open the window.
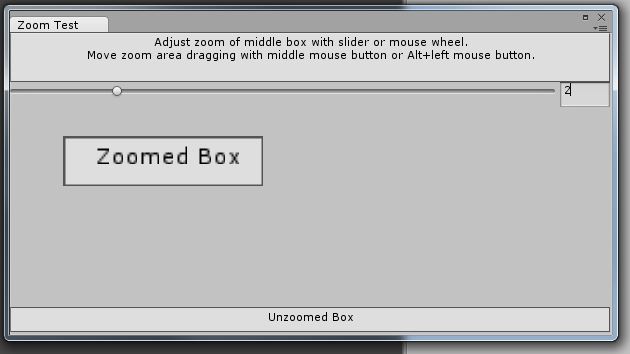
The ZoomTest editor window zoomed in to a zoom scale of 2.0.
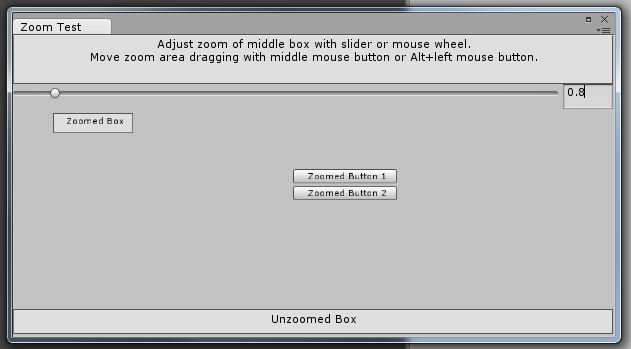
The ZoomTest window zoomed out to a zoom scale of 0.8.
Details Please
Let's walk through the code step-by-step. If you can't wait or want to look at a full example first, skip down to the end of this post for all of the code.
First, we'll put all the code into static functions, kind of like how Unity's GUI class works. Let's call it EditorZoomArea.
using UnityEngine;

public class EditorZoomArea
{
    public static Rect Begin(float zoomScale, Rect screenCoordsArea)
    {
        ...
    }
    public static void End()
    {
        ...
    }
}
With this, client code can call EditorZoomArea.Begin and EditorZoomArea.End inside OnGUI to begin and end an a zoomable draw area. EditorZoomArea.Begin receives the desired zoom scale and the rectangle in editor window screen coordinates where the zoom area is located. By screen coordinates I mean the coordinate system that has pixels as units and that starts at the top-left corner of the editor window, just below the tab that displays the title, and that extends to [Screen.width, Screen.height]. It's the standard, pixel-based coordinate system used in any editor window.
The first thing we need to do in EditorZoomArea.Begin is to end the group that Unity implicitly begins for every editor window. We do this by simply calling GUI.EndGroup. Note that when EditorZoomArea.Begin is called you must not be in between a GUI.Begin/EndGroup or GUILayout.Begin/EndArea call or else our little trick of calling GUI.EndGroup to end the implicit group that every Unity editor window has won't work.
    public static Rect Begin(float zoomScale, Rect screenCoordsArea)
    {
        GUI.EndGroup();
        ...
    }
The next step is to set up correct clipping of the zoomed draw area by calling GUI.BeginGroup. This clip area is independent of the editor window size but needs to match our zoomed in or zoomed out draw area. For example, if we were to zoom in by a factor of 2 and our zoom area has a screen width and height of 200 by 200, we would need the clip area to be 100 by 100 pixels. If we were to zoom out by half, i.e. by a factor of 0.5, we would need the clip area to be 400 by 400 pixels.
    public static Rect Begin(float zoomScale, Rect screenCoordsArea)
    {
        GUI.EndGroup();

        Rect clippedArea = screenCoordsArea.ScaleSizeBy(1.0f / zoomScale, screenCoordsArea.TopLeft());
        clippedArea.y += kEditorWindowTabHeight;
        GUI.BeginGroup(clippedArea);

        ...
    }
Note that we add kEditorWindowTabHeight, which has a value of 21, to the top edge of the clip area. That's to compensate for the editor window tab at the top that displays the window name. Remember, we ended the group that Unity implicitly begins that normally prevents us from rendering over it. So we need to account for that and that's why we add 21 pixels to the top edge of the clip area.
The final step is to change the GUI.matrix to do the scaling for us. To do that we need to create a composite matrix that first translates the clip area's top-left corner to the origin, then does the scaling around the origin, and finally translates the zoomed result back to where the clip area is supposed to be.
    public static Rect Begin(float zoomScale, Rect screenCoordsArea)
    {
        GUI.EndGroup();

        Rect clippedArea = screenCoordsArea.ScaleSizeBy(1.0f / zoomScale, screenCoordsArea.TopLeft());
        clippedArea.y += kEditorWindowTabHeight;
        GUI.BeginGroup(clippedArea);

        _prevGuiMatrix = GUI.matrix;
        Matrix4x4 translation = Matrix4x4.TRS(clippedArea.TopLeft(), Quaternion.identity, Vector3.one);
        Matrix4x4 scale = Matrix4x4.Scale(new Vector3(zoomScale, zoomScale, 1.0f));
        GUI.matrix = translation * scale * translation.inverse * GUI.matrix;

        ...
    }
Note that for good style and to play nice we save off the old GUI.matrix and concatenate it with our scale matrix. However, the code pretty much assumes that you haven't messed with GUI.matrix before calling EditorZoomArea.Begin.
Finally, in EditorZoomArea.End we simply reset the GUI.matrix to what it was before, end the group for the clip area that we began, and begin Unity's implicit group for the editor window again. Please check the full source code below for details.
Full Code Sample
Here's the full EditorZoomArea.cs file that you can use in your code:
using UnityEngine;

// Helper Rect extension methods
public static class RectExtensions
{
    public static Vector2 TopLeft(this Rect rect)</pre>
    {
        return new Vector2(rect.xMin, rect.yMin);
    }
    public static Rect ScaleSizeBy(this Rect rect, float scale)
    {
        return rect.ScaleSizeBy(scale, rect.center);
    }
    public static Rect ScaleSizeBy(this Rect rect, float scale, Vector2 pivotPoint)
    {
        Rect result = rect;
        result.x -= pivotPoint.x;
        result.y -= pivotPoint.y;
        result.xMin *= scale;
        result.xMax *= scale;
        result.yMin *= scale;
        result.yMax *= scale;
        result.x += pivotPoint.x;
        result.y += pivotPoint.y;
        return result;
    }
    public static Rect ScaleSizeBy(this Rect rect, Vector2 scale)
    {
        return rect.ScaleSizeBy(scale, rect.center);
    }
    public static Rect ScaleSizeBy(this Rect rect, Vector2 scale, Vector2 pivotPoint)
    {
        Rect result = rect;
        result.x -= pivotPoint.x;
        result.y -= pivotPoint.y;
        result.xMin *= scale.x;
        result.xMax *= scale.x;
        result.yMin *= scale.y;
        result.yMax *= scale.y;
        result.x += pivotPoint.x;
        result.y += pivotPoint.y;
        return result;
    }
}

public class EditorZoomArea
{
    private const float kEditorWindowTabHeight = 21.0f;
    private static Matrix4x4 _prevGuiMatrix;

    public static Rect Begin(float zoomScale, Rect screenCoordsArea)
    {
        GUI.EndGroup();        // End the group Unity begins automatically for an EditorWindow to clip out the window tab. This allows us to draw outside of the size of the EditorWindow.

        Rect clippedArea = screenCoordsArea.ScaleSizeBy(1.0f / zoomScale, screenCoordsArea.TopLeft());
        clippedArea.y += kEditorWindowTabHeight;
        GUI.BeginGroup(clippedArea);

        _prevGuiMatrix = GUI.matrix;
        Matrix4x4 translation = Matrix4x4.TRS(clippedArea.TopLeft(), Quaternion.identity, Vector3.one);
        Matrix4x4 scale = Matrix4x4.Scale(new Vector3(zoomScale, zoomScale, 1.0f));
        GUI.matrix = translation * scale * translation.inverse * GUI.matrix;

        return clippedArea;
    }

    public static void End()
    {
        GUI.matrix = _prevGuiMatrix;
        GUI.EndGroup();
        GUI.BeginGroup(new Rect(0.0f, kEditorWindowTabHeight, Screen.width, Screen.height));
    }
}
Here's a full example in form of a single C# file ZoomTestWindow.cs using the above EditorZoomArea class. It supports zooming in and out with both the slider at the top and the mouse wheel. You can also move the zoomable area around by either holding down on the middle mouse button or by using alt+left click.
using System;
using System.Collections.Generic;
using UnityEngine;
using UnityEditor;

public class ZoomTestWindow : EditorWindow
{
    [MenuItem("Window/Zoom Test")]
    private static void Init()
    {
        ZoomTestWindow window = EditorWindow.GetWindow(false, "Zoom Test");
        window.minSize = new Vector2(600.0f, 300.0f);
        window.wantsMouseMove = true;
        window.Show();
        EditorWindow.FocusWindowIfItsOpen();
    }

    private const float kZoomMin = 0.1f;
    private const float kZoomMax = 10.0f;

    private readonly Rect _zoomArea = new Rect(0.0f, 75.0f, 600.0f, 300.0f - 100.0f);
    private float _zoom = 1.0f;
    private Vector2 _zoomCoordsOrigin = Vector2.zero;

    private Vector2 ConvertScreenCoordsToZoomCoords(Vector2 screenCoords)
    {
        return (screenCoords - _zoomArea.TopLeft()) / _zoom + _zoomCoordsOrigin;
    }

    private void DrawZoomArea()
    {
        // Within the zoom area all coordinates are relative to the top left corner of the zoom area
        // with the width and height being scaled versions of the original/unzoomed area's width and height.
        EditorZoomArea.Begin(_zoom, _zoomArea);

        GUI.Box(new Rect(0.0f - _zoomCoordsOrigin.x, 0.0f - _zoomCoordsOrigin.y, 100.0f, 25.0f), "Zoomed Box");

        // You can also use GUILayout inside the zoomed area.
        GUILayout.BeginArea(new Rect(300.0f - _zoomCoordsOrigin.x, 70.0f - _zoomCoordsOrigin.y, 130.0f, 50.0f));
        GUILayout.Button("Zoomed Button 1");
        GUILayout.Button("Zoomed Button 2");
        GUILayout.EndArea();

        EditorZoomArea.End();
    }

    private void DrawNonZoomArea()
    {
        GUI.Box(new Rect(0.0f, 0.0f, 600.0f, 50.0f), "Adjust zoom of middle box with slider or mouse wheel.\nMove zoom area dragging with middle mouse button or Alt+left mouse button.");
        _zoom = EditorGUI.Slider(new Rect(0.0f, 50.0f, 600.0f, 25.0f), _zoom, kZoomMin, kZoomMax);
        GUI.Box(new Rect(0.0f, 300.0f - 25.0f, 600.0f, 25.0f), "Unzoomed Box");
    }

    private void HandleEvents()
    {
        // Allow adjusting the zoom with the mouse wheel as well. In this case, use the mouse coordinates
        // as the zoom center instead of the top left corner of the zoom area. This is achieved by
        // maintaining an origin that is used as offset when drawing any GUI elements in the zoom area.
        if (Event.current.type == EventType.ScrollWheel)
        {
            Vector2 screenCoordsMousePos = Event.current.mousePosition;
            Vector2 delta = Event.current.delta;
            Vector2 zoomCoordsMousePos = ConvertScreenCoordsToZoomCoords(screenCoordsMousePos);
            float zoomDelta = -delta.y / 150.0f;
            float oldZoom = _zoom;
            _zoom += zoomDelta;
            _zoom = Mathf.Clamp(_zoom, kZoomMin, kZoomMax);
            _zoomCoordsOrigin += (zoomCoordsMousePos - _zoomCoordsOrigin) - (oldZoom / _zoom) * (zoomCoordsMousePos - _zoomCoordsOrigin);

            Event.current.Use();
        }

        // Allow moving the zoom area's origin by dragging with the middle mouse button or dragging
        // with the left mouse button with Alt pressed.
        if (Event.current.type == EventType.MouseDrag &&
            (Event.current.button == 0 && Event.current.modifiers == EventModifiers.Alt) ||
            Event.current.button == 2)
        {
            Vector2 delta = Event.current.delta;
            delta /= _zoom;
            _zoomCoordsOrigin += delta;

            Event.current.Use();
        }
    }

    public void OnGUI()
    {
        HandleEvents();

        // The zoom area clipping is sometimes not fully confined to the passed in rectangle. At certain
        // zoom levels you will get a line of pixels rendered outside of the passed in area because of
        // floating point imprecision in the scaling. Therefore, it is recommended to draw the zoom
        // area first and then draw everything else so that there is no undesired overlap.
        DrawZoomArea();
        DrawNonZoomArea();
    }
}
